Retractable fly screens offer significant benefits and importance in modern homes. They provide an effective barrier against insects while allowing fresh air to circulate, enhancing indoor comfort. Their retractable design ensures unobstructed views and easy storage when not in use, maintaining aesthetic appeal. Additionally, these screens contribute to energy efficiency by reducing the need for air conditioning. Their versatility allows for installation on various types of doors and windows, catering to different architectural styles. Overall, retractable fly screens are essential for promoting a healthy, comfortable, and energy-efficient living environment, combining practicality with convenience and elegance.
Understanding Fly Screen Doors for Your Home
A fly screen door is a protective barrier installed on exterior doors to prevent insects and pests from entering while allowing fresh air and natural light to flow into the home. Made from fine mesh, these screens are designed to block even the smallest bugs without compromising visibility or ventilation.
Different Types of Fly Screen Doors:
1. Hinged Fly Screen Doors: These are traditional screen doors that open outward or inward, mounted on hinges. They are simple, durable, and suitable for most standard doors.
2. Sliding Fly Screen Doors: Designed for sliding glass doors, these screens move horizontally along a track, making them ideal for large openings and patio doors.
3. Magnetic Fly Screen Doors: These screens use magnetic strips to attach to the door frame, allowing easy access and closure. They are typically easy to install and remove.
4. Retractable Fly Screen Doors:
• Design: Retractable fly screen doors can be rolled or slid into a discreet housing when not in use, maintaining an unobstructed view.
• Benefits: They provide flexibility and convenience, especially for areas where a permanent screen might be cumbersome.
• Versatility: These screens are suitable for various door types, including French doors and bi-fold doors, making them a versatile solution for different architectural styles.
• Aesthetic Appeal: When retracted, they are virtually invisible, preserving the visual appeal of the doorway.
Retractable fly screen doors stand out for their practicality and unobtrusive design, offering an elegant solution to keep insects out while enjoying fresh air and unobstructed views.
Step-by-Step Guide on How to Install a Fly Screen Door
Installing our EZY retractable fly screens is a straightforward DIY project that can enhance your home’s comfort and aesthetic. To get started, you’ll need a measuring tape, a drill, and a drop saw. Follow these simple steps to ensure a perfect fit and seamless installation.
Steps:
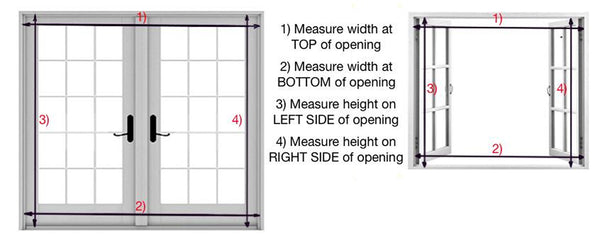
1. Measure Your Door or Window Frame:
Begin by measuring the inside dimensions of your door or window frame where the fly screen will be installed. Measure the width and height accurately to ensure a snug fit.
2. Cut the Cassette and Tracks to Size:
Using the measurements you’ve taken, cut the cassette and tracks to size with the drop saw. Ensure the cuts are precise to allow the components to fit perfectly within the frame. The cassette houses the retractable screen, while the tracks guide its movement.
3. Prepare the Installation Area:
Clean the inside of the frame to remove any dust or debris that might obstruct the installation. A clean surface ensures better adhesion and smoother operation of the screen.
4. Install the Cassette:
Position the cassette at the top of the frame. Use a drill to secure it in place, ensuring it is level. This step is crucial for the smooth retraction and extension of the screen.
5. Attach the Tracks:
Next, install the vertical tracks on either side of the frame. These tracks guide the screen as it retracts and extends. Ensure they are aligned correctly with the cassette for optimal functionality. Use the drill to secure them firmly.
6. Test the Screen:
After installation, pull the screen down to check its movement. It should glide smoothly within the tracks and retract effortlessly back into the cassette.
By following these steps, you can easily install our EZY retractable fly screens, enjoying a bug-free and breezy home environment. For further assistance, refer to the detailed instruction manual included in the kit.
How to Adjust a Fly Screen Door Closer for Optimal Performance
Before installing your retractable fly screen, it’s crucial to check the area for any obstructions. Ensure you have at least 35mm of unobstructed depth away from handles or hinges to accommodate the screen cassette and tracks. This prevents interference and ensures smooth operation. Additionally, testing the screen’s tension before installation is essential. Proper tension ensures the screen retracts smoothly and consistently, enhancing functionality and longevity. Verifying these aspects beforehand guarantees a hassle-free installation and optimal performance of your retractable fly screen, providing effective insect protection and ventilation.
Expert Tips to Simplify Fly Screen Door Installation
1. Accurate Measurements:
• Measure the inside dimensions of your door or window frame precisely. Double-check both width and height to ensure accurate cuts for the cassette and tracks.
2. Use Quality Tools:
• Utilize a sharp drop saw for clean cuts and a reliable drill for secure fastening. High-quality tools contribute to a smoother installation process.
3. Clean the Frame:
• Thoroughly clean the installation area to remove dust, dirt, and debris. A clean surface ensures better adhesion and smoother operation of the screen.
4. Check for Obstructions:
• Ensure you have at least 35mm of unobstructed depth away from handles or hinges. This space is necessary for the cassette and tracks to fit properly.
5. Pre-Drill Holes:
• Pre-drill holes in the frame for the screws. This step makes it easier to secure the cassette and tracks and prevents wood or frame splitting.
6. Level Installation:
• Use a spirit level to ensure the cassette is perfectly horizontal. A level installation is crucial for the screen to retract and extend smoothly.
7. Test Tension:
• Before final installation, test the screen’s tension to ensure it retracts as desired. Adjust the tension mechanism as needed for smooth operation.
Tips for a Snug Fit:
1. Precise Cutting:
• Cut the cassette and tracks to the exact measurements of your frame. Accurate cuts ensure a snug fit and prevent gaps.
2. Proper Alignment:
• Align the tracks perfectly with the cassette. Misalignment can cause the screen to jam or retract unevenly.
3. Secure Fastening:
• Use the correct type and length of screws to firmly attach the cassette and tracks. Loose fittings can lead to misalignment and operational issues.
By following these expert tips, you can achieve a smooth installation, ensure a snug fit, and maintain your retractable fly screens for long-lasting performance and reliability.
Conclusion: Fly Screen Door Installation
Installing retractable fly screens can enhance your home’s comfort and functionality. By measuring accurately, using quality tools, and ensuring a clean, unobstructed installation area, you can achieve a seamless installation. Following these expert tips will help you enjoy the benefits of retractable fly screens, including insect protection, improved ventilation, and energy efficiency, for years to come. A well-installed and maintained fly screen not only boosts your home’s aesthetics but also contributes to a healthier living environment. Are you ready to enjoy the benefits of fly screens? Contact us today!


