Keeping your fly screen mesh in tip-top condition keeps pesky bugs away and maintains your home’s style. Luckily, replacing fly screen mesh is easy… Handle the process yourself with just a few basic tools—no professional help is needed! Read on to learn how to replace fly screen mesh without a fuss.
For a visual step-by-step, check out this helpful video:
Why Replace Your Fly Screen Mesh?
Holes, rips, and exposure to the elements stop your fly screens from being as effective as they once were. Thankfully, Ezy Screens offers strong fibreglass mesh that doesn’t need frequent replacement. But when it does there are a few tools and simple steps to keep in mind…
Tools You’ll Need
Fly Screen Mesh
Ezy Screens offers durable fibreglass mesh, providing effective protection against insects and ensuring long-lasting performance for your home.
Utility Knife or Scissors
A utility knife or scissors are important to have on hand to trim the mesh to the correct size for a precise fit. This prevents gaps and enhances the screen's overall effectiveness.
Measuring Tape
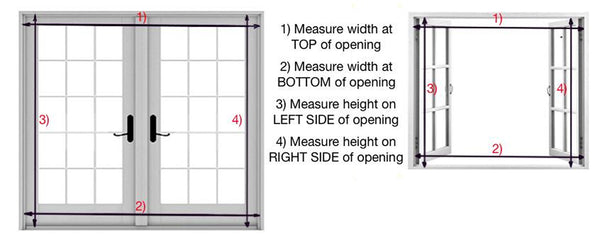
This tool is important! Before cutting the new mesh, use a measuring tape to ascertain the frame dimensions. There’s nothing more frustrating than cutting too much or too little mesh.
Mesh Replacement Roll
Our mesh replacement comes in a roll that you just pop into the cassette.
Step-by-Step Guide to Replacing Fly Screen Mesh
Step 1: Removing the Old Screen
Now you have the tools, let's see how to apply them to replace your fly screen mesh. First, use your flat-head screwdriver to carefully remove the old mesh from the frame.
Step 2: Measuring and Preparing the New Mesh
Next, use your tape measure to check the frame dimensions before cutting the new mesh slightly larger to allow for adjustments. Place the mesh over the frame to check the fit.
Step 3: Installing the New Mesh
Our mesh replacement comes in a roll for easy installation into the cassette. Just pop the roll into the cassette.
Common Mistakes to Avoid
While replacing your fly screen mesh is easy once you get a hang of the process there are a couple of common pitfalls to be aware of, like:
· avoid cutting the mesh too short, as it can lead to gaps, and
· take care not to damage the frame while removing the old mesh.
How to Maintain Your Fly Screen Mesh?
Inspecting the Mesh for Holes and Tears
Regularly check your mesh for damage. Small holes can lead to bigger ones if not addressed promptly.
Tightening Loose Mesh
Over time the mesh may loosen. Check it periodically so it remains secure.
Removing Dirt and Grime Build-up
Clean your fly screens regularly to prevent dirt and grime from accumulating as this can affect visibility and air flow.
FAQs on Fly Screen Replacement
1. How often should I replace my fly screen mesh? Typically, you should inspect your fly screen mesh annually and replace it if you notice any damage.
2. Can I replace the fly screen mesh without professional help? For sure! You can easily replace your fly screen mesh with basic tools and this guide.
3. What type of mesh is best for high-traffic areas? For high-traffic areas consider using pet-resistant mesh to withstand general wear and tear.
Ready for a Seamless Fly Screen Replacement? Let Ezy Screens Help!
Contact Ezy Screens today for professional advice and assistance or to purchase our high-quality DIY kits. Our products protect your home from pests while looking great. Visit Ezy Screens and enjoy peace of mind with our three-year warranty on mesh!


